By Leslie A. Young
Originally published in Body Sense magazine, Autumn/ Winter 2003.
Now is the time of year when it’s easy to contemplate hibernation — turning to comfort food, seeking solace inside and lying around for days (months) on end. But, unless you want a roly-poly bear physique and a growling personality, you should embrace the cooler weather and welcome the changes.
You don’t have to be a downhill ski enthusiast or a biathlete to get the most out of winter exercise. With the proper clothing and preparation you can walk or snowshoe your way through winter — and enjoy it — until spring’s thaw.
Lauren Brand is athletic director at the Allegria Spa in the Park Hyatt Beaver Creek, west of Vail, Colo. She excels at helping guests enjoy the outdoors. “I think most people feel much better when they get outside in the sun and the fresh air. Winter definitely scares people into staying inside. They automatically think: ‘I have to stay inside. It’s icky out.’”
But doing just the opposite can help fuel your mind and body, Brand says. “Be in the snow or be in the rain or be in the wind. You start to notice every day you go outside you feel much better and you feel more connected to your environment. Even if it’s just for 10 minutes — go outside and walk around the block. Feel the cold air against your skin; it’s really revitalizing.”
Snowshoeing is a popular way to find that revitalization. Brand says she’s seen an increase in the number of guests snowshoeing — from tots to grandparents. Downhill skiing isn’t accessible to many people because of geographics and cost, she says, but snowshoeing is easy for almost everyone.
“The gear you rent is really inexpensive and snowshoeing is so simple to learn. It gives you access to being outside in the winter and strips away any excuses. Once you experience the quiet solitude and walk through the powder, you’re hooked. Your pace and the type of terrain are variables that can make your journey more or less challenging.”
Whether you’re walking or snowshoeing, wearing the right gear is crucial, Brand says.
James Tiefenthaler agrees. He’s a sales specialist at REI’s original flagship store in Seattle, Wash. He makes sure newcomers start with a good base layer of clothing. “It’s important that it has very good insulatory capabilities with a low bulk.” The key, Tiefenthaler says, is “getting moisture away from your body. When you have water next to your skin, heat leaves your body 500 times faster. The drier you are, the warmer you are.”
Subsequent layers should add insulation and/or serve as wind protection depending upon the conditions, Tiefenthaler says. And with the efficiency of modern fabrics, you don’t have to add a lot of bulk to get a great deal of protection. “We’re used to overbundling and looking like Frosty the Snowman out there,” he says. “But now it’s easy to stay warm, look athletic and be comfortable at the same time.
“As you get to know how you perform in different types of temperature ranges, you’ll also develop a further sense of whether you want that 200-weight fleece vest or if you’re going with the big thick down jacket today.”
The wonderful thing about dressing in layers is you have the modular capability of putting on or taking off clothes as the day gets warmer or you become more active.
Many of Allegria Spa’s guests in Beaver Creek make the mistake of showing up for snowshoe classes in their ski clothes. However, that’s probably too much clothing for snowshoeing, Brand says.
The feet and hands don’t often get the attention they deserve when it comes to insulation, but the same concepts apply. Tiefenthaler says, “Your feet can produce a pint of sweat in three hours. Make sure you have socks and gloves — and a hat — that wick and transfer moisture.”
Once you’re dressed properly, you can rent snowshoes for dollars a day if you don’t want to buy your own. Waterproof cross trainers or hiking boots will fit right into most snowshoes. It’s important to get snowshoes with a binding that’s easy to manipulate with gloves on, Brand says.
“The binding should cinch down and feel secure both forward and back and side-to-side. Definitely try them on with shoes you’ll be wearing.”
The size of the snowshoes you need has to do with your weight and the type of terrain you’ll cross, Brand says. “The longer the snowshoe, the more weight they can support.” If you’re going to go through a lot of powder, you’ll need a bigger shoe and you’ll need to educate yourself about avalanche safety.
“Poles can come in handy for balance especially on steeper slopes,” she says. “Using poles may also improve muscle tone in your arms, increase your heart rate and take some of the pressure off your knees.”
Whether you’re trekking the backcountry or negotiating the neighborhood park, you’re setting an example, Brand says. “By changing our behaviors we change the next generation. If you bring (children) up in an environment where it’s fun to get outside and exercise, it becomes natural to them.”
Jim Albert of Jamesburg, N.J., runs www.rockandpaddle.com, a sport club that offers a variety of year-round activities to its members. He offers free snowshoeing events for preteens and teens. “The parents usually join them and we get a lot of people mostly by word of mouth,” Albert says.
This is one activity that everyone, including the family dog, can share. And it’s a fun escape, Brand says. “Go out with the intention of just playing in the snow and feeling like a little kid. There’s almost a sense of magic when you’re out in the snow and you just stop for a look. The blanket of snow muffles the noise of the world. You may only be 10 minutes away from where you work or live, but you feel as if you’re in the wilderness.”
Leslie A. Young is editor of Body Sense magazine.
Stretches for All Seasons
Photos by Ellen Jaskol
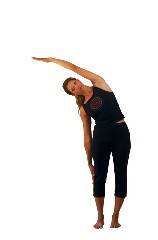
Side Bend: Begin with a neutral spine — one that’s not hyperextended or tucked under. Lift your ribs up and away from your pelvis, then drop your shoulder. Slide your hand as far as is comfortable down the outside of your leg. Note: Keep the opposite arm down at your side for support.
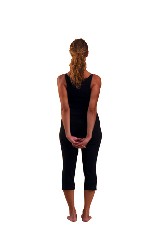
Chest Expansion: Place your feet hip-width apart. Interlock your hands behind your back. Squeeze your shoulder blades back. Hinge your body at your hips, drawing your belly button in and fold over forward. Note: If you need to, bend your knees.

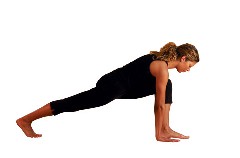
Low Lunge: With your hands on the floor, step back with one leg as far as you can comfortably. Keep the extended leg straight and press through the heel. Your hips should face forward with your knee over your ankle. You should be able to see your toes. Keep your arms straight and don’t hyperextend your elbows. If you want to open your chest, clasp your hands behind your head and flatten your shoulder blades. Note: You can keep your hands on the floor or on one knee. For greater comfort or stability, you can rest one knee on the floor, too.
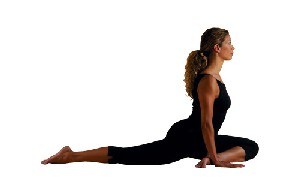
Pigeon: From the low lunge, walk your foot over to the opposite hand and drop your knee to the floor. Your extended leg should be back with your knee and toes pointed to the floor. Note: Lift your chest if you feel tension in your knee. Support your body with your hands, if necessary. You may need to put a blanket or soft support under your extended leg and hip.
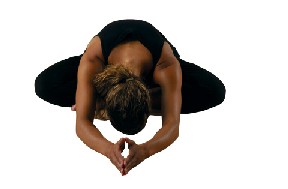
Seated Fold: Sit on the floor with your legs crossed. Lift your spine out of your pelvis, then lengthen and fold your spine over your legs. Note: Keep your elbows on your knees or put your hands on the floor for support.
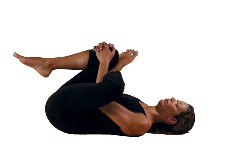
Figure 4 Stretch: Lie on your back, square your hips to the floor and lengthen your tailbone. As you cross one leg over, gently pull your knees to your chest. Note: Keep your head and shoulders on the floor; use a strap if necessary to pull your feet up.

Twist: Sit flat on the floor, extending one leg in front of you and bending the other leg behind. Twist your torso toward the knee that’s bent. Reach up and back to deepen the stretch if you wish. Note: With each inhalation lengthen your spine and deepen the twist.
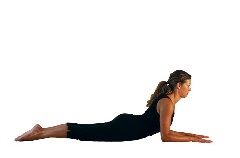
Sphinx: Lying on your stomach, place your elbows under your shoulders with your hands flat on the floor. Squeeze your shoulder blades back, together and down. Press your hips, legs and toes into the floor. Extend through your tailbone toward your heels. Use your toes and elbows to stretch your ribs away from your hips. Lift your heart forward. Extend from your belly button to your shins. Note: If you feel any tension in your lower back, tighten your abdominal muscles and pull them off the floor.
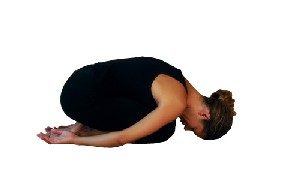
Child's Pose: Situate yourself on the floor with your knees together or apart and press your hips into your heels. Fold your torso over your legs. Drop your shoulders to the side. Your arms should be at your side with the palms of your hands facing up. Your forehead should rest on the ground. Note: You may wish to use a pillow under your forehead or to spread your knees wider. You can also use a pillow under your hips and/or feet.


