By Sabrina Stevens
Originally published in Body Sense magazine, Fall 2001.
Yoga for your face may sound a little far-fetched by those who practice it say it’s no farce. In fact, StarFace, a multi-layered workout program that can be done at home, can improve your look, as well as lessen the intensity of several severe medical problems, according to face-yoga enthusiasts. When applied properly and practiced regularly, the exercises are therapeutic, rejuvenating and they put the power of treatment into your own hands.
The following workouts will help improve mouth symmetry, release tension caused by stress or injury, soften your smile, reshape your lips, define your upper lip peaks and begin to firm your cheek muscles. Although it requires some focused attention to exercise and massage the face, the treatment is wonderfully hedonistic.
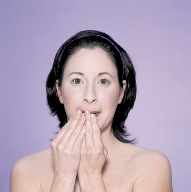
Luscious Lip Massage
The Luscious Lip Massage helps those mouths that tend to purse, grimace or depress the muscle tissue surrounding the lips.
Here’s what to do:
1. Using your right hand, place the tips of your fingers on your face slightly away (1 inch) from the right corner of your mouth. Resist away from your mouth.
2. Using the forefinger and the middle finger of the left hand (photo 1), sculpt using firm pressure, beginning at the upper right corner of the mouth and moving toward the center of the lip.
3. Repeat stroke seven times.
4. Now sculpt the lower right corner of your mouth using a pressure that suits your sensitivity (light, medium or deep).
5. Switch positioning. Place your left hand slightly away (1 inch) from the left corner of your mouth. Resist away from mouth.
6. Using the forefinger and middle finger of the right hand, sculpt using firm pressure beginning at the upper left corner of the mouth and move toward the center of the lip.
7. Repeat this stroke seven times then sculpt the lower left corner of your mouth.
Tips: Remember to sculpt on clean skin (i.e., remove makeup and lipstick). Use an appropriate massage cream. For oily and problem skin types, use oil-free gels. For lined lips, use fruit enzyme creams. For normal skin, use aromatherapy sculpting oil with some slightly active topical solution. Wait 3–5 days after a strong peeling treatment before massaging the lip area with pressure or with active topical solutions. If you’re recovering from surgery, consult with your physician before massaging the face. Micro-movements, which require no pressure, can usually begin a few weeks after surgery.
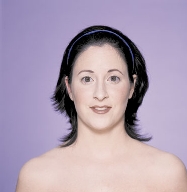
The Active Resting Pose with the Breath of Seven
Being centered and open, while maintaining a balanced inner smile, are some of the benefits of the Active Resting Pose. Most of your time will be spent here. This pose can be a real challenge for those mouths that like to purse, grimace or depress the muscles surrounding the lips. Though it looks as if nothing much is happening on the outside, it’s the concentration that makes the difference.
Here’s what to do:
1. While looking in a mirror, relax your face.
2. Set your teeth apart slightly, allowing the lips to separate.
3. Breathe fully.
4. Allow the lips to form into a slight smile. (photo 2)
5. Curl the tongue to touch the roof of the mouth.
6. Hold this pose for the following:
a. Inhale for a count of seven.
b. Breathe in through the nose and throat, and out through your nose and throat (midline breathing).
c. Hold the breath in for a count of seven.
d. Exhale for a count of seven.
e. Hold your breath out for a count of seven.
7. Repeat for seven cycles.
Tips: Many of the workouts begin and end with the Active Resting Pose. Breathe in this pose throughout the day; beware, it requires continual self-checking. Begin by becoming aware of negative mouth postures.
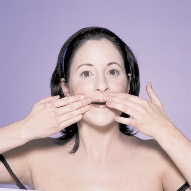
The Lip Smoother “Exerssage”
The Lip Smoother Exerssage is needed to warm the tissue around the lips before reshaping the lips themselves.
Here’s what to do:
1. Set teeth slightly apart (1 inch).
2. Curl your lips around your teeth (Half-Moon Pose).
3. Begin midline breathing.
4. Join the hands together, side by side, arching the fingers backward. (photo 3)
5. Stroke briskly up and down over the entire lip area.
6. Repeat this movement seven times, all the while remembering to breathe correctly.
7. Perform three sets of seven.
Now that the muscles are properly warmed up, proceed to the workouts. Workouts should be done in triple slow motion (TSM) and accompanied by deep, rhythmic breathing.
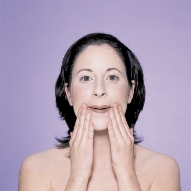
Workout I: The Moon Pose. The Moon Pose heightens cheek contours, strengthens the cheek muscles and helps to eliminate nose-to-mouth grooves. This pose also assists in releasing jaw tension.

Here’s what to do:
1. With the mouth open as if you are going to yawn, inhale through your nose. (Photo 4)
2. Keeping the mouth open, exhale through the nose.
3. Using the hands, spread the lower lip apart.
4. While keeping your breathing rhythmic, extend the corners of your mouth forward toward the mirror to form a full-moon shape.
5. Open your jaw wider.
6. Freeze — resist with your cheek muscles isometrically, drawing away from the nose-to-mouth grooves.
7. Hold this pose for 12 midline breaths.
8. Slowly return to the Active Resting Pose.
Tips: The Moon Pose requires continual adjustment. Slightly extend the chin upwards, but drop the cheek muscles near the nose. Relax, but don’t let the jaw slacken. If you experience jaw tension or discomfort, open the jaw only as wide as you can while still comfortably benefiting from the stretch. Again, focus on your breathing and the release of tension.
Workout 2: The Half-Moon Pose. The Half-Moon Pose releases muscle tension from around the mouth that may be a result of clenching, grimacing or pursing the lips. This pose balances the smile and builds fuller upper lips and lip peaks.
Here’s what to do:
1. Open the jaw slightly, separating the teeth approximately one inch apart.
2. Curl the lips around the teeth.
3. Begin to smooth out the lips by directing the corners of the mouth toward the ears. (photo 5)
4. Create equal and dynamic tension on both corners of the mouth.
5. Use the hands to hug the sides of the mouth for resistance.
6. Begin midline breathing.
7. Slowly open the jaw a little wider.
8. Hold this position for three midline breaths.
9. Now, release only the peak of the upper lip.
10. Keep the bottom lip curled.
11. Curl the upper lip and brace it on the teeth.
12. Hold this position for a count of three.
13. Keep midline breathing.
14. Spread the upper lip apart.
15. Hold this position for a count of three.
16. Slowly, release only the peak of the upper lip.
17. Curl and release 20 times. If you experience jaw tension or discomfort, work only to five and then gradually increase.
18. Slowly return to the Active Resting Pose.


